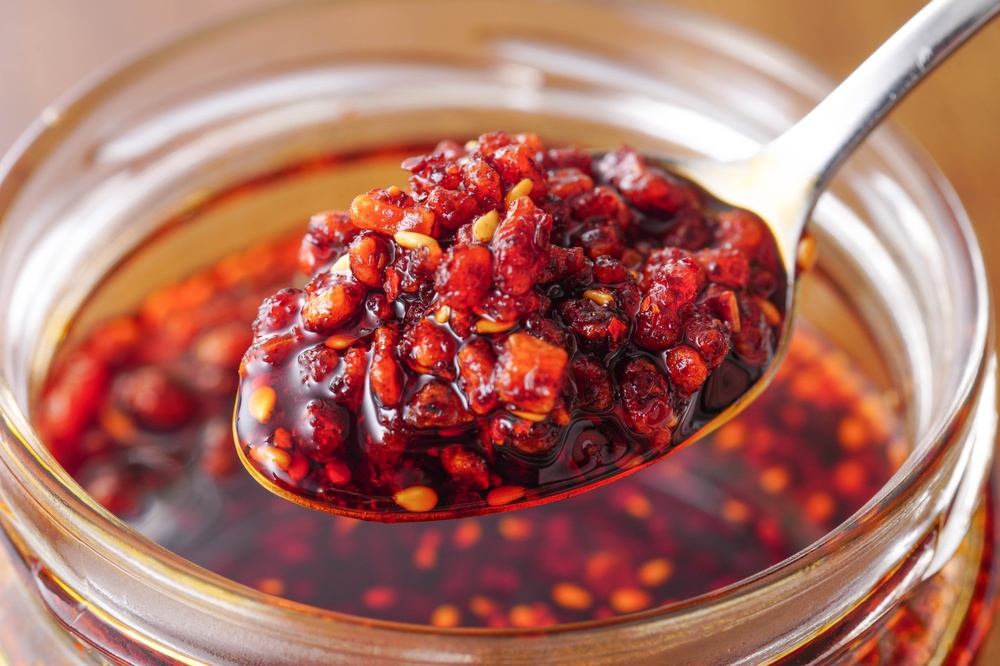
If you love adding a little heat and crunch to your favorite meals, homemade chili crisp deserves a spot in your kitchen. This spicy, savory condiment combines crispy bits of garlic and shallots with fragrant oil, crunchy chili flakes, and a delicious blend of seasonings. One spoonful can transform plain noodles, fried eggs, dumplings, rice bowls, and even roasted vegetables into something special.
The best part? You can prepare your own batch in about 20 minutes using simple pantry ingredients. There’s no need to hunt for a specialty store or spend extra money on a jar when you can customize the flavor at home.
Whether you enjoy a gentle warmth or a fiery kick, this easy chili crisp recipe lets you control the heat, crunch, and seasoning. Let’s get cooking!
What Is Chili Crisp?
Chili crisp is a spicy condiment made with oil, dried chilies, and crunchy ingredients such as garlic, shallots, or toasted spices. It is popular in Chinese cuisine and has become a favorite among home cooks who enjoy bold flavors and contrasting textures.
Unlike a smooth hot sauce, chili crisp contains little crunchy pieces suspended in flavorful oil. The combination of heat, savory seasoning, and crisp texture makes it incredibly versatile.
You can spoon it over noodles, stir it into soups, drizzle it over dumplings, or use it to give everyday meals a delicious upgrade. Some versions are intensely spicy, while others lean toward smoky, nutty, or savory flavors.
Chili Crisp
Ingredients
- ½ cup neutral oil such as canola, sunflower, or peanut oil
- ¼ cup dried red chili flakes adjusted to your preferred heat level
- 4 garlic cloves thinly sliced
- 2 small shallots thinly sliced
- 1 tablespoon sesame seeds
- 1 teaspoon Sichuan peppercorns lightly crushed, optional
- 1 teaspoon soy sauce
- ½ teaspoon sugar
- ½ teaspoon salt or to taste
Instructions
-
Thinly slice the garlic and shallots so they cook evenly. Measure the chili flakes, sesame seeds, salt, sugar, and optional spices into a heatproof bowl. Choose a bowl that can comfortably hold the oil without splashing. A metal or heatproof glass bowl is ideal. Keep the soy sauce separate for now. Adding water-based ingredients directly to very hot oil can cause dangerous splattering.
-
Pour the neutral oil into a small saucepan and add the sliced garlic and shallots while the oil is still cool. Set the pan over medium-low heat and cook gently, stirring occasionally. As the oil warms, the garlic and shallots will begin releasing their flavor and gradually turn golden. This usually takes around 6–10 minutes, depending on the thickness of the slices and your stove.
-
Once the pieces are lightly golden, remove them with a heatproof slotted spoon and place them on a clean plate or paper towel. They will continue to darken slightly as they cool, so remove them before they become deep brown.
-
Carefully heat the remaining oil until it reaches approximately 300–325°F (150–165°C), using a thermometer if available. Keep the temperature controlled rather than allowing the oil to smoke.
-
Pour the hot oil slowly over the chili flakes and sesame seeds in the heatproof bowl, stirring carefully with a heat-resistant utensil. The mixture should bubble gently as the oil releases the chilies' color and aroma.
-
If the oil is too hot, the chili flakes may burn and develop a bitter flavor. If you don't have a thermometer, heat the oil gently and test a tiny amount over a small pinch of chili flakes before adding the rest.
-
Let the oil cool briefly until the bubbling has settled. Stir in the soy sauce, sugar, salt, and optional crushed Sichuan peppercorns. Add the crispy garlic and shallots, then mix everything thoroughly so the crunchy pieces are distributed throughout the oil. Taste a small amount once the mixture has cooled enough to sample safely. Add extra chili flakes for more heat or a pinch of sugar to balance the spice.
-
Allow the chili crisp to cool completely before transferring it to a clean, dry, heat-safe container. For the best texture, make sure the garlic and shallots are crisp rather than soft or soggy. If they have absorbed a lot of oil, you can add a little more neutral oil after the mixture has cooled, provided all the ingredients remain safely handled. Your homemade chili crisp is ready to serve!
Tips for the Best Homemade Chili Crisp
A few simple techniques can make a big difference in the final flavor.
- Keep the heat under control. Garlic and chili flakes can burn quickly, so gentle cooking is better than rushing the process.
- Use a neutral oil. Canola, sunflower, and peanut oils let the chili and aromatics shine. Avoid oils with low smoke points for this hot-oil method.
- Adjust the spice level. Start with less chili if you’re sensitive to heat. You can always add more in a future batch.
- Slice aromatics evenly. Thin, uniform slices are easier to crisp without burning some pieces while others remain soft.
- Let the flavors settle. The chili crisp often tastes more rounded after the seasonings have had time to mingle.
- Use dry equipment. Water droplets can cause hot oil to splatter, so make sure your utensils and bowl are dry before beginning.
Delicious Ways to Use Chili Crisp
Once you’ve made a jar, you’ll find plenty of excuses to use it. Here are some easy ideas to try.
Toss It With Noodles
Stir a spoonful into cooked noodles with soy sauce, a splash of vinegar, and a little noodle water. Add spring onions, sesame seeds, or your favorite protein for a quick meal.
Upgrade Your Eggs
Drizzle chili crisp over fried, scrambled, or boiled eggs. The crunchy chilies add a spicy contrast to the creamy yolk, making breakfast much more exciting.
Add It to Rice Bowls
Mix a little into steamed rice or spoon it over a bowl topped with chicken, tofu, vegetables, or a fried egg. It instantly adds heat and savory flavor.
Serve It With Dumplings
Use chili crisp as a topping for steamed or pan-fried dumplings. You can also combine it with soy sauce and a little vinegar to create a quick dipping sauce.
Give Roasted Vegetables a Kick
Toss roasted cauliflower, potatoes, carrots, or broccoli with a small spoonful of chili crisp just before serving. Adding it at the end helps preserve the crunchy texture.
Spread It on Sandwiches
Mix a little chili crisp into mayonnaise or spread a thin layer onto a sandwich or burger. It creates a spicy, savory condiment that pairs especially well with eggs, grilled chicken, and roasted vegetables.
Easy Ways to Customize Your Chili Crisp
One of the best things about making chili crisp yourself is the freedom to change the flavor.
- For extra crunch: Add more sesame seeds or a small amount of finely chopped roasted peanuts after the oil has cooled.
- For a smoky flavor: Use a portion of smoked dried chili flakes.
- For a savory boost: Add a small amount of mushroom powder or finely ground toasted spices.
- For a citrusy twist: Add a little finely grated dried orange peel.
- For a milder version: Reduce the chili flakes and increase the sesame seeds slightly.
If you experiment with fresh herbs, fresh garlic, fresh shallots, or other moisture-containing ingredients, remember that these can affect food safety and storage. Do not assume a homemade oil mixture will be shelf-stable simply because it contains salt or chili.
How to Store Homemade Chili Crisp Safely
Because this recipe contains garlic and shallots in oil, storage deserves special attention. Homemade garlic-in-oil mixtures can support the growth of Clostridium botulinum, the bacteria that causes botulism, when stored improperly. The absence of an unusual smell or visible spoilage does not guarantee safety.
Follow these precautions:
- Transfer the cooled chili crisp to a clean, dry, covered container.
- Refrigerate it promptly at 40°F (4°C) or below.
- For a conservative homemade garlic-in-oil approach, use it within four days, then discard any leftovers.
- Freeze portions if you want to keep them longer, using a suitable freezer-safe container.
- Use a clean, dry spoon each time you serve it.
- Discard the mixture if it has been left unrefrigerated for an extended period or if you suspect it has been handled unsafely.
Do not store homemade garlic-and-shallot chili crisp at room temperature or assume that covering the ingredients with hot oil makes it safe for long-term pantry storage. Commercial products may use validated processing methods that are not replicated in a home kitchen.
Common Chili Crisp Mistakes to Avoid
Burning the garlic: Dark brown garlic can make the oil bitter. Remove the slices when they are just golden.
Heating the oil until it smokes: Excessive heat can damage the oil and burn the chili flakes. Use a thermometer or keep the heating process gentle and controlled.
Adding wet ingredients to very hot oil: Soy sauce and other water-based ingredients can cause splattering. Let the bubbling settle before adding them.
Using too much chili at once: Chili varieties differ significantly in heat. Start with a moderate amount and adjust the next batch to your taste.
Expecting a shelf-stable condiment: Homemade chili crisp containing garlic and shallots needs careful refrigeration, even when the oil looks clear and the ingredients appear crisp.
Final Thoughts
Homemade chili crisp is an easy way to bring bold flavor and satisfying crunch to everyday meals. With dried chilies, garlic, shallots, and a few pantry staples, you can create a condiment that tastes just the way you like it in around 20 minutes.
Keep the oil temperature under control, avoid burning the aromatics, and experiment with different spice combinations to find your favorite version. Most importantly, refrigerate your homemade batch promptly and handle it safely.
Make a small batch, keep it chilled, and you’ll have a delicious way to brighten noodles, eggs, rice bowls, and countless other dishes whenever you’re craving a little extra heat.